


Installation instructions for Cisco Unified CME
This guide assumes that you have already purchased or ported in a number and are somewhat familiar with the user portal. For the full guide to using the DID Logic Portal, check this article.
Components used
– Cisco Cloud Services Router 1000v with IOS XE Release 16.12.06
– Cisco Unified CME Release 12.6


DID Logic regional gateways:
| Regional gateway | FQDN | IP Address |
|---|---|---|
| Primary regional gateway | sip.se.didlogic.net | 5.150.254.205 |
| Secondary regional gateway | sip.nl.didlogic.net | 185.118.63.77 |
Note: Carefully select a primary gateway with minimal ping and a failover option.
Configuring SIP Trunk on the DID Logic portal
Creating SIP Account
On the “SIP” tab click “Create account”, then

- Configure Device Name (optional). Device names are especially useful when you manage multiple SIP accounts.
- Set password. Remember that strong passwords are a critical element of account security.
- Repeat password.
- Set Caller ID associated with SIP account. Only DIDs purchased through DID Logic will be available on the dropdown list.
- ‘Send inbound didinfo’ option should be enabled when registering a PBX or an SBC. This feature instructs DID Logic gateways to replace the SIP Account number in the SIP URI and ‘To:’ headers with the originally dialed number (DID). This option should be disabled only if you register SIP Phones directly with DID Logic.
Tip. If you prefer to manage Caller IDs locally on CME, please be sure to either inform your account manager or email [email protected] to have this feature enabled on your account (see Configuring Caller ID Passthrough for more details).
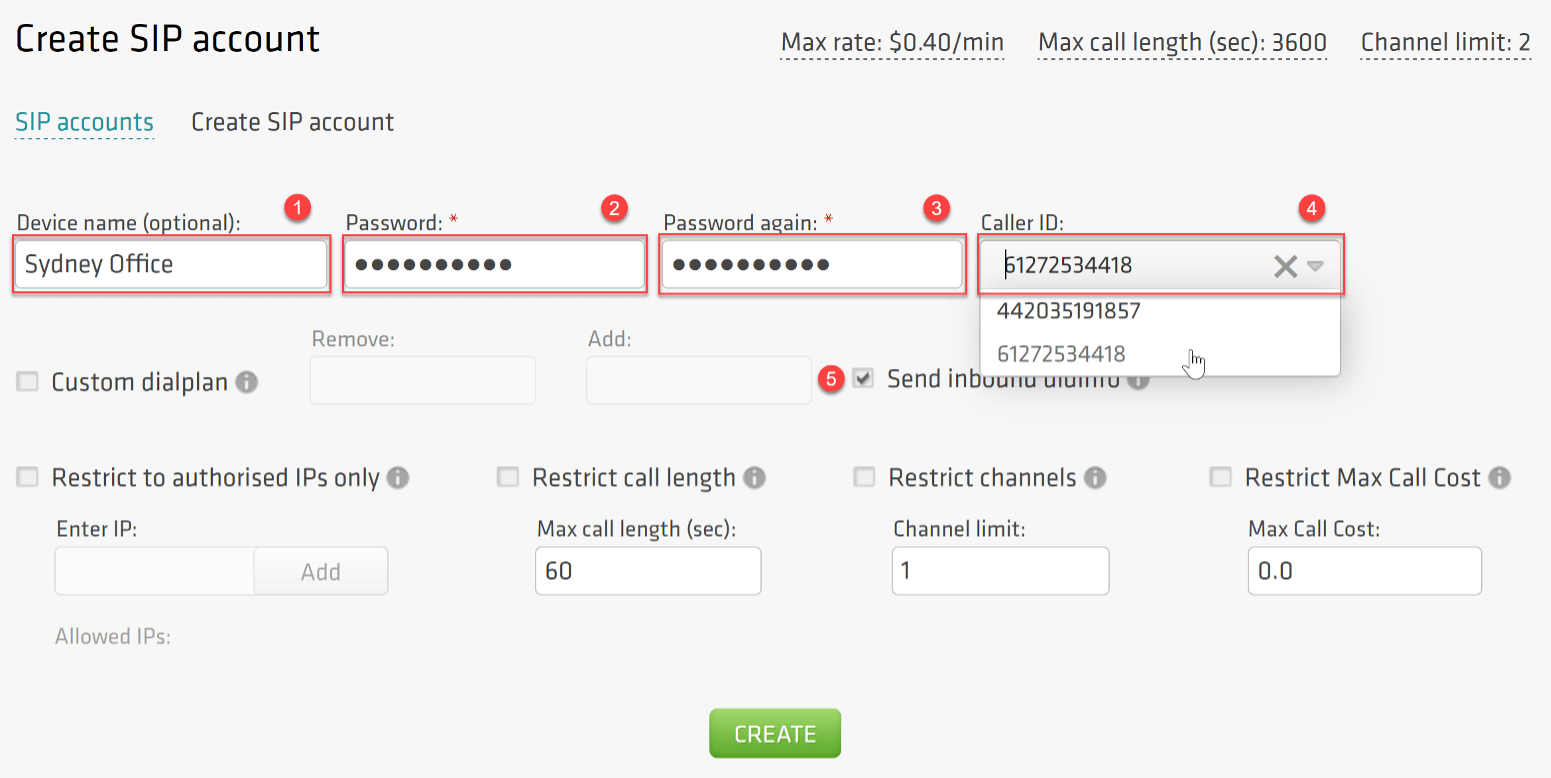
Click the Create button to complete the configuration.
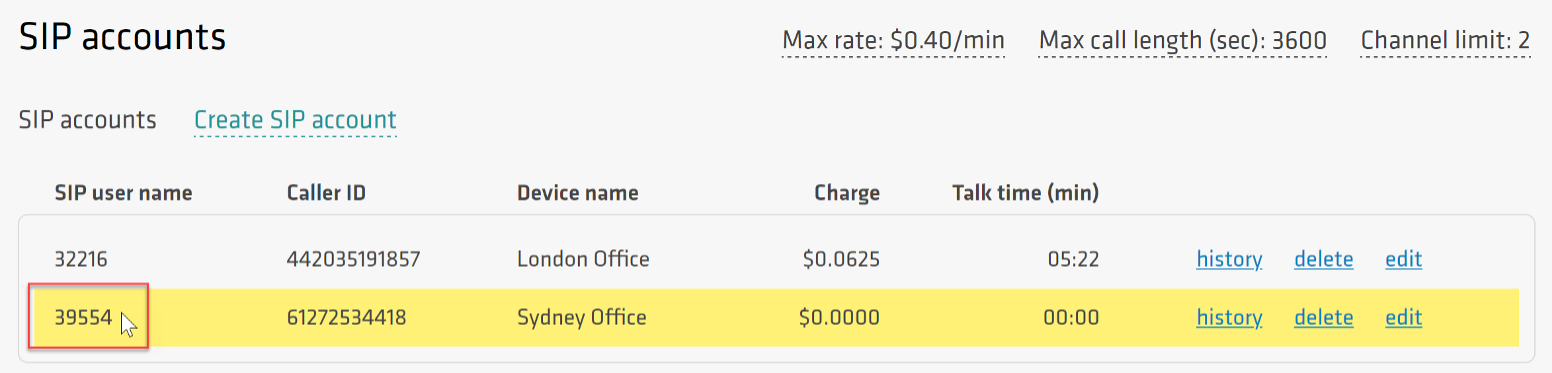
Once SIP Account is created, you will see a 5-digit number that you should use as Username to authenticate your SIP device with DID Logic.
Setting up inbound routing
There are 3 options for the inbound call routing:
- SIP device: incoming calls will be routed to the respective SIP account if there is an active registration on any of the DID Logic gateways
- SIP URI (user_part@domain_part): incoming calls will be routed to the specified SIP URI address
- Phone: incoming calls will be forwarded to a PSTN number
Note:
– Multiple destinations can be configured for a single DID to ensure failover or provide call coverage options
– You can choose the preferred call distribution algorithms: ‘sequential’ or ‘ring all’
Go to the Purchased tab and click Edit on the number you want to be routed to a SIP Account.
Select an account and click Add:

Now that your SIP account has been created and the inbound routing set up, you can start configuring your Cisco Unified CME.
Configuring SIP Trunk on Cisco Unified CME
Registering SIP Account
To receive inbound calls, you must register your SIP Account with one of the regional DID Logic gateways:
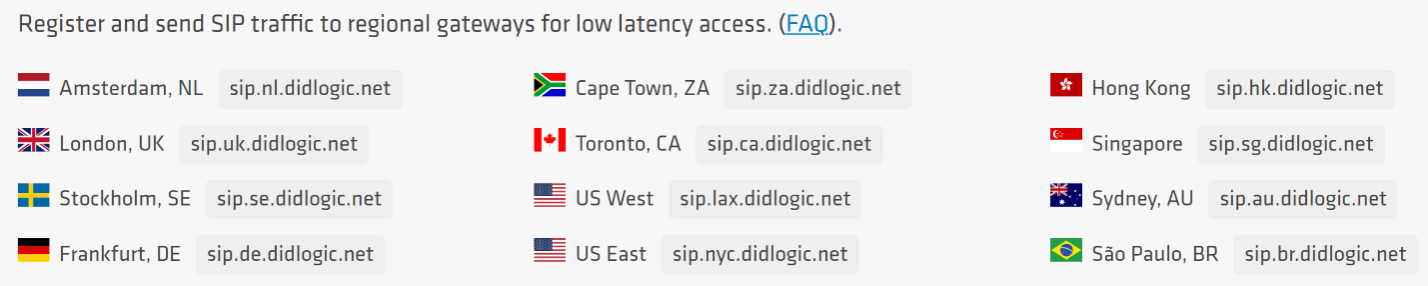
Choose a regional gateway that is closer to your location (for the purpose of this guide, it is sip.se.didlogic.net) and configure registrar parameters:
sip-ua
 ! Register SIP Account using its 5-digit numeric ID as username
 credentials number 39554 username 39554 password 0 <strong password>
realm sip.se.didlogic.net
 ! Configure registrar
 registrar dns:sip.se.didlogic.net expires 3600
 ! Configure gateway for outbound calls
 sip-server dns:sip.se.didlogic.net
 ! SIP transport connections will use a single local port
 connection-reuse
 ! As this is a PSTN connection we don’t send caller name
 no remote-party-id
Note:
– For this configuration to work, the DNS server should be configured on your CME
– Authentication realm is different for each gateway and equals its hostname
– SIP Registration is carried over UDP by default. You can switch transport to tcp by using the respective parameter in the registrar command: ‘registrar dns:sip.se.didlogic.net expires 3600 tcp’
Once the configuration is completed, you can verify SIP Account registration using the ‘show sip-ua register status’ command:

If registration is successful, you will see ‘yes’ in the reg column for your SIP Account Line.
Tip. To prevent CME from sending unnecessary SIP REGISTER requests from IP phones, you should disable this feature. Apply the following configuration depending on the IP Phone type:
- For SIP phones:
voice register dn 1
 number 2002
 ! Disable phone DN registration via SIP Trunk
 no-reg
- For SCCP phones:
ephone-dn  10  dual-line
 ! Disable primary DN registration via SIP Trunk
 number 2001 no-reg primary

ephone-dn  11  dual-line
 ! Disable primary and secondary DNS registration via SIP Trunk
 number 2001 secondary 2003 no-reg both
Configuring Inbound calls
For inbound calls to work, your SIP Account must be registered as described in the ‘Registering SIP Account’ section.
Starting from Cisco IOS Release 15.1(2)T / Cisco Unified CME 8.1, the ‘Toll Fraud Prevention’ feature is enabled by default to enhance the security posture of a device. To allow incoming calls from the DID Logic regional gateway, add its IP Address to the trusted list in the ‘voice service voip’ section:
voice service voip
 ip address trusted list
  ! Add IP Address of regional gateway sip.se.didlogic.net
  ipv4 5.150.254.205
Tip. If you configure a session target for outgoing dial-peer in the form of an IP address, i.e. ‘session target ipv4:5.150.254.205’, you don’t need to explicitly add it to the trusted list as it will be automatically allowed based on the dial-peer configuration. You can verify the current trust list by using the ‘show ip address trusted list’ command.
To ensure accurate matching of inbound calls and to set desired preferences, configure the incoming dial-peer:
dial-peer voice 2000 voip
 description *** DID Logic Inbound ***
 session protocol sipv2
 session transport tcp
 ! Match dial-peer based on the called number
 incoming called-number 61272534418
 voice-class codec 1
 dtmf-relay rtp-nte
 no vad
Now inbound calls should work.
Authenticate your CME
By default, DID Logic responds with 407 Proxy Authentication Required to every SIP INVITE. Configure authentication username under the ‘sip-ua’ section to support this authentication option.
sip-ua
 authentication username 39554 password 0 <your strong password>
realm sip.se.didlogic.net
Note:
– The specified realm must match the hostname of the regional DID Logic gateway to which you intend to route your calls.
Alternatively, you can enable IP Authentication for your SIP Account. In this case, DID Logic gateways will accept all outbound calls from the specified IP address without further authentication. To set up IP Authentication, please contact support at [email protected] and provide a public IP Address you will be sending outbound calls from.
Note:
– SIP Accounts with IP Authentication enabled cannot be used as the destination assigned to DIDs on the portal. SIP URI addresses must be used instead.
In terms of Unified CME configuration, there are no additional commands you need to add for the IP Authentication to work.
Configuring Outbound Calls
Configure global settings in the ‘voice service voip’ section:
voice service voip
 ! Allow SIP Phones to dial via SIP Trunks
 allow-connections sip to sip
 ! Enable call forward and transfer for SIP Phones
 no supplementary-service sip moved-temporarily
 no supplementary-service sip refer
Define the list of preferred codecs:
voice class codec 1
 codec preference 1 g711ulaw
 codec preference 2 g711alaw
 codec preference 3 g729r8
If your users dial with a prefix (e.g. 0, 00, or 011), configure a translation profile to strip the leading digits as all destination numbers routed to DID Logic must be in the E.164 format. You may also need to insert the country code if numbers are dialed in the domestic format. The following example shows how you can strip the leading 00:
voice translation-rule 1000
 ! Strips 00
 rule 1 /^00/ //
 !
voice translation-profile NGN-OUT
 translate called 1000
Add dial-peers for outbound call routing:
dial-peer voice 1000 voip
 ! Outgoing dial-peer to support the 00 prefix
 description *** DID Logic Outbound ***
 ! Strip the prefix
 translation-profile outgoing NGN-OUT
 destination-pattern 00T
 session protocol sipv2
 session target sip-server
 session transport tcp
 voice-class codec 1
 dtmf-relay rtp-nte
 no vad
!
dial-peer voice 1001 voip
 ! Outgoing dial-peer for E.164 dialing
 description *** DID Logic Outbound ***
 ! For E.164 dialing with + sign
 destination-pattern +T
 session protocol sipv2
 session target sip-server
 session transport tcp
 voice-class codec 1
 dtmf-relay rtp-nte
 no vad
Note:
– Session transports supported are: UDP, TCP, and TLS
– Session target can also point to the selected regional gateway: ‘session target dns:sip.se.didlogic.net’ or ‘session target ipv4:5.150.254.205’
Now outbound calls should work.
Configuring Caller ID Passthrough
When you configure SIP Account settings on the DID Logic portal, you normally assign one of the purchased DID numbers as Caller ID.
If you want to use your own A-numbers and send them directly from CME, you need to contact your account manager or send an email to [email protected] first and request Caller ID passthrough to be activated. Note that this feature may be unavailable depending on individual eligibility.
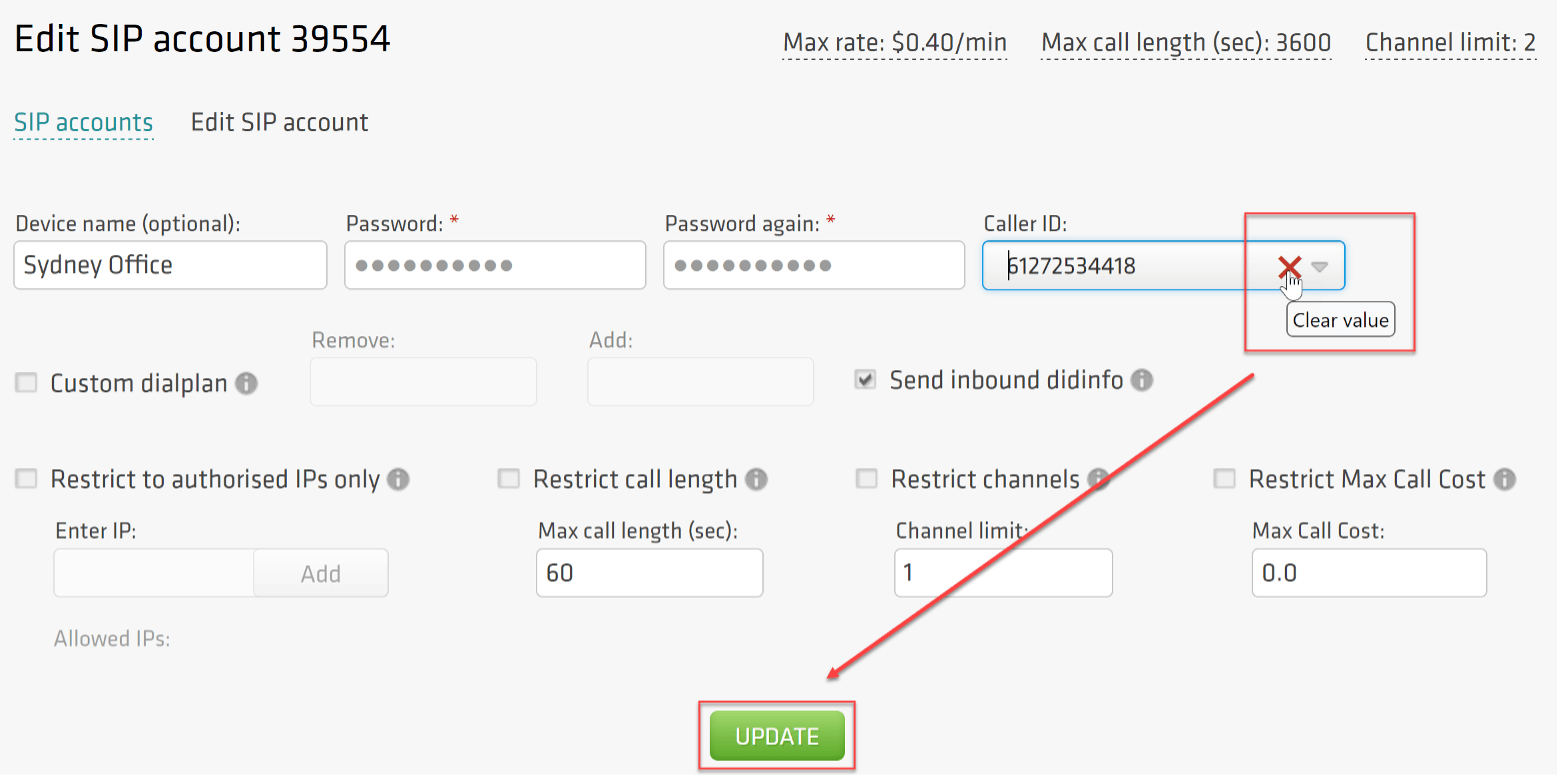
Once your request is approved and the feature is enabled, you need to remove the Caller ID assigned to your SIP Account to allow Custom Caller ID passthrough.
Updating SIP Account settings
Log in to the DID Logic Portal, go to the SIP section, and click Edit on the SIP Account. Remove Caller ID and click Update:
You should see your SIP Account updated:
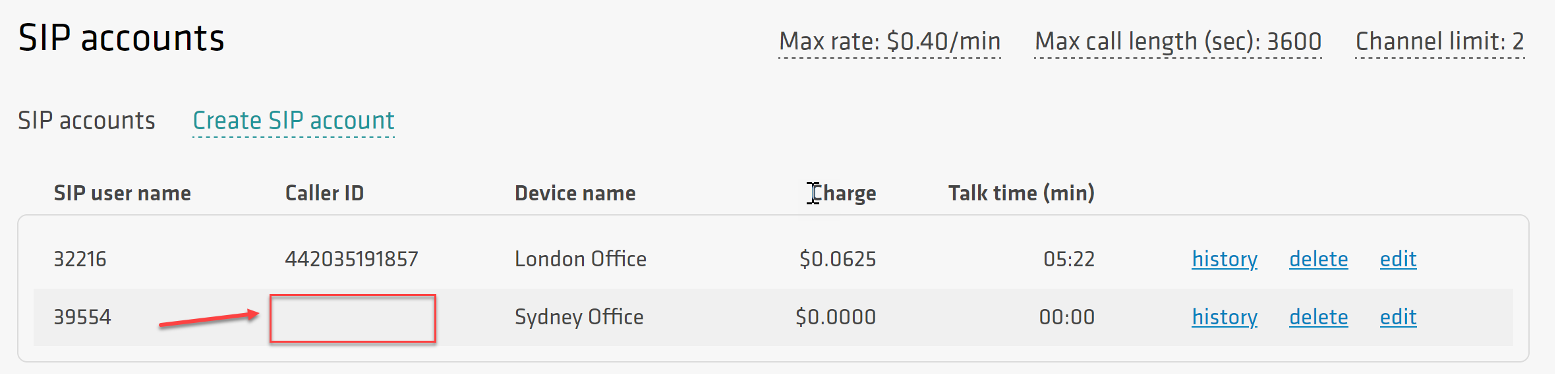
Tip. If there is no Caller ID associated with the SIP Account while the Caller ID passthrough is disabled, your outbound calls will be passed over the public network with the Anonymous Caller ID. Anonymous calls tend to be routinely deprioritized and may even be barred by carriers.
Configuring Custom Caller ID on Cisco Unified CME
By default, Cisco Unified CME utilizes an IP Phone DN as the Caller ID for calls through a SIP Trunk. You can modify the Caller ID for outgoing dial-peers using translation profiles.
Configure a voice translation rule to replace internal DNs with the desired Caller ID and modify the translation-profile NGN-OUT by adding a calling number translation rule:
voice translation-rule 3000
  ! Replace internal DNs with desired Caller ID
  rule 1 /.*/ /61272534418/
 !
voice translation-profile NGN-OUT
  translate calling 3000
Tip. As this translation profile is already assigned to outgoing dial-peers, you don’t need to modify the associated configuration.
Setting up failover routing
To ensure business continuity and safeguard against potential service interruptions, it’s crucial to consider SIP Trunk failover scenarios.
This guide offers configuration options for failover mechanisms for both incoming and outgoing calls.
Inbound call failover
To protect against inbound call disruptions, we’ll use dual registrars. First, let’s allow CME to process incoming calls from both regional gateways:
voice service voip
 ip address trusted list
  ! Add IP Address of primary regional gateway sip.se.didlogic.net
  ipv4 5.150.254.205
  ! Add IP Address of secondary regional gateway sip.nl.didlogic.net
  ipv4 185.118.63.77
Next, configure dual registrars under ‘sip-ua’ section:
sip-ua
  ! Define SIP Account details for primary registrar
  credentials number 39554 username 39554 password 0
<SIP Account strong password> realm sip.se.didlogic.net
  ! Define SIP Account details for secondary registrar
  credentials number 39554 username 39554 password 0
<SIP Account strong password> realm sip.nl.didlogic.net
  ! Authentication username is used to authenticate outbound calls
  authentication username 39554 password 0 <your strong password> realm
sip.se.didlogic.net
  ! Authentication username is used to authenticate outbound calls
  authentication username 39554 password 0 <your strong password> realm
sip.nl.didlogic.net
  ! Configure primary registrar
   registrar 1 dns:sip.se.didlogic.net expires 3600
  ! Configure secondary registrar
   registrar 2 dns:sip.nl.didlogic.net expires 3600
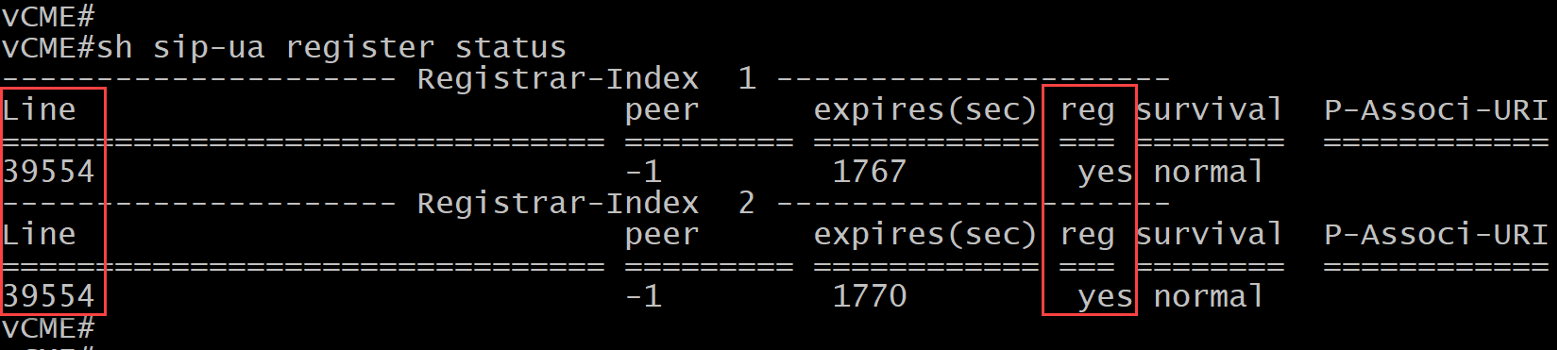
Once the configuration is completed, you can verify SIP Account registration with the DID Logic gateways by using the ‘show sip-ua register status’ command:
If registration is successful, you will see ‘yes’ in the reg column for your SIP Account Line on both regional gateways.
Outbound call failover
First, you must configure multiple dial-peers. Dial-peer priority is defined with the ‘preference’ command. As dial-peers should point to different regional gateways, we need to specify the gateway name by using the ‘session-target’ command instead of the global sip-server reference:
dial-peer voice 1000 voip
 ! Outgoing dial-peer for dialing habits with prefix
 description *** DID Logic Outbound Primary ***
 ! Strip prefix for international dialing
 translation-profile outgoing NGN-OUT
! Define primary dial-peer
 preference 1
 destination-pattern 00T
 session protocol sipv2
 session target dns:sip.se.didlogic.net
 session transport tcp
 voice-class codec 1
 dtmf-relay rtp-nte
 no vad
!
dial-peer voice 1002 voip
 ! Outgoing dial-peer for dialing habits with prefix
 description *** DID Logic Outbound Secondary ***
 ! Strip prefix for international dialing
 translation-profile outgoing NGN-OUT
! Define secondary dial-peer
 preference 2
 destination-pattern 00T
 session protocol sipv2
 session target dns:sip.nl.didlogic.net
 session transport tcp
 voice-class codec 1
 dtmf-relay rtp-nte
 no vad
You may want to repeat the same configuration for outgoing dial-peers with the E.164 dialing.
Common issues
Common issues with outbound calls
- 603 Declined response might be caused by the lack of active registration. Check sip-ua register status as outlined below
- another typical reason for the 603 Declined is a call to the destination with the per minute rate higher than the Max rate set for your account. You can find your effective Max rate on the SIP tab. If you would like to have it changed, please contact [email protected]
- incorrect destination number format. Dial full international numbers (E.164): 12125551212 (US), 442085000000 (UK). Dialing 2125551212 won’t work. Do not dial with 0, 00, or 011 in front. This guide explains how you can strip the leading digits before the call is routed to DID Logic.
Common issues with inbound calls
- make sure IP addresses of DID Logic regional gateways are either explicitly added to the trust list under ‘voice service voip’ section or dynamically allowed via dial-peer session targets
- make sure you have a translation profile or num-exp configured to translate incoming called numbers from the E.164 format to internal DN or hunt-group
Troubleshooting SIP Trunk connectivity
1. Confirm SIP Account registration by using the ‘show sip-ua register status’ command:
You should observe that the SIP Account is registered with the regional gateway(s).
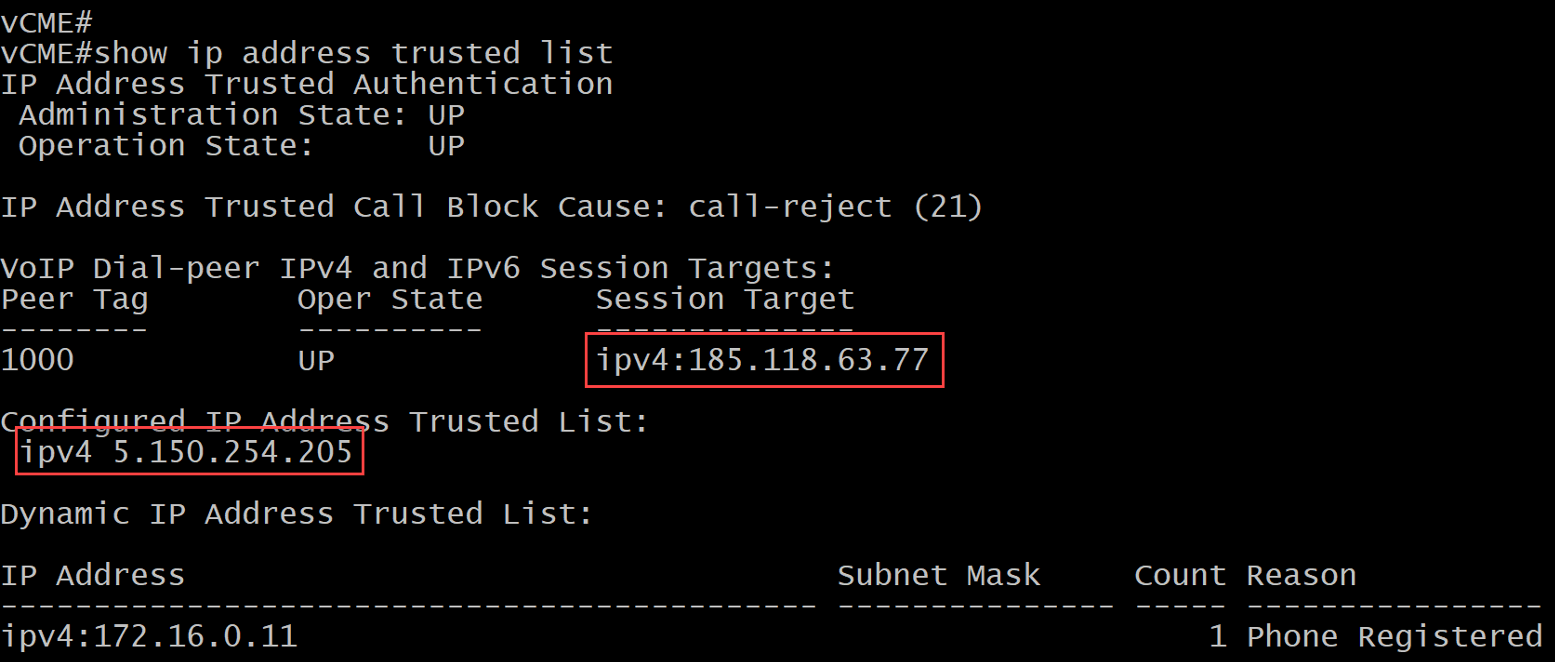
2. Verify that the IP Addresses of DID Logic regional gateways are allowed for incoming calls by using the ‘show ip address trusted list’ command:
3. If you are still experiencing issues, enable the following debugs, make a test call, and review the debug output:
- debug voice ccapi inout
- debug ccsip messages
- debug voice translation
If you are using TCP transport, you may want to try the following command:
- debug ip tcp transactions
Free trial is available for IT infrastructure managers and developers.