


Yeastar P-Series PBX Setup Guide for DIDlogic
This guide outlines the steps to configure your Yeastar P-series PBX to make and receive phone calls using the DIDlogic trunk provider.
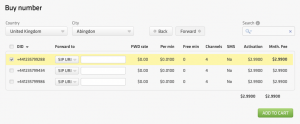
Purchase a number on the DIDlogic platform
- Log in to your DID Logic account
- Click to BUY in the top menu
- Select the country and region where you wish to purchase a number
- Choose a specific number or numbers and click the Add to Cart button
- You will be redirected to the Cart to confirm your choice and check out the DID(s).
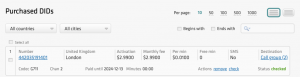
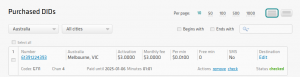
Once you have purchased the DID, it will be reflected in the PURCHASED tab.
[NOTE]
Some numbers may require proof of local address and other documents before activation. To activate these numbers, upload the requested documents and await approval from the DID Logic Provisioning team.
Configure the DIDlogic Digest SIP account
Create a SIP account on the DID Logic platform
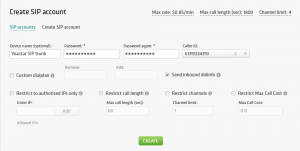
To create a new SIP account on the DID Logic platform:
- Navigate to the SIP tab in the top menu
- Click the Create SIP account button
- Specify the SIP account name, set the SIP account password, and select one of the DIDs on your account as the Caller ID
- You can optionally restrict access by specifying authorized IPs, maximum call length, channels, and maximum call cost. If these parameters are not configured, the global account limits will apply
- Click Create.
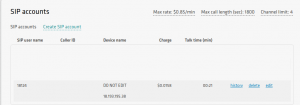
Once your SIP account is successfully created, it will appear in the list of SIP accounts.
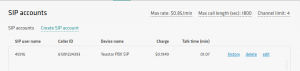
[NOTE]
Please be advised that your 5-digit SIP account username is generated automatically and displayed in the SIP user name column.
Configuring a SIP Trunk in Yeastar
To set up inbound and outbound calling on your Yeastar system:
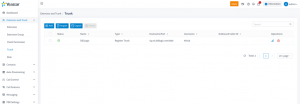
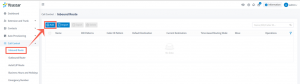
- Access the Yeastar management console by logging into the admin account.
- From the left-hand menu, select Extension and Trunk > Trunk.
- Press the Add button.
Setting Up DID Logic as a SIP Trunk Provider
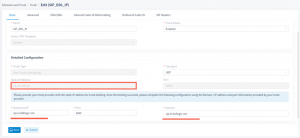
- Under Detailed Configuration, input the 5-digit SIP account ID as the username with the password you configured for the SIP account on the DID Logic platform.
- Provide the address of one of DID Logic’s regional SIP gateways in the Hostname/IP and Domain fields. For best results, select the proxy closest to your location. You can find a complete list of regional gateways under the SIP tab in the DID Logic portal.
- Provide a descriptive name for your Yeastar trunk.
- Click Save to finalize the configuration.

Once Yeastar has successfully registered a trunk on the DID Logic SIP gateway, a green tick will appear next to the trunk.
Configure DID Logic IP Authentication SIP account
Create a SIP account on the DID Logic platform
To create a new IP-authenticated SIP account on the DID Logic platform:
- Submit a Request: Contact the Support Team at [email protected] and provide the static public IP address of your Yeastar instance for configuration.
- Important Note: By default, each IP address can be associated with only one SIP account. If you require multiple DID Logic SIP accounts to share the same IP address, please inform the Support Team in your request.
- SIP Account Creation: Once the Support Team has completed the setup, the new SIP account will appear in the SIP Accounts section of your DID Logic account.
Configure DID Logic IP Authentication Trunk
The IP Authentication DID Logic SIP account refers to the Peer Trunk in the Yeastar PBX.
Set up the Peer Trunk at the administrator level of the Yeastar instance. Once configured successfully, this trunk can be shared with tenants.
Please follow the below steps:
- Access the Yeastar management console by logging into the admin account.
- From the left-hand menu, select Extension and Trunk > Trunk.
- Press the Add button.
- Under Detailed Configuration, select Peer Trunk (Port based) in the Trunk Type field.
- In the Static IP Address field, you will find the IP address of the PBX instance that you must share with the support team.
- Provide the address of one of DID Logic’s regional SIP gateways in the Hostname/IP and Domain fields. For best results, select the proxy closest to your location. You can find a complete list of regional gateways under the SIP tab in the DID Logic portal.
- Click Save to finalize the configuration.
To ensure your endpoint accepts incoming calls from our regional SIP gateways, follow these steps to allowlist them:
- Navigate to Security Settings: From the left-hand menu, select Security > Security Rules.
- Add a New Rule: Press the Add button to create a new rule.
- Name the Rule: Provide a descriptive name for the rule (e.g., “DID Logic SIP Gateways”).
- Set Rule Type: Under the Type dropdown, select Domain.
Continue configuring the rule as needed to allow traffic from our SIP gateways.
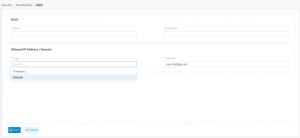
- In the Domain field, enter any of our regional SIP gateways (e.g. sip.nl.didlogic.net)
- Repeat these steps for the remaining gateways. You can find the complete list under the SIP tab on the DID Logic portal.
Configure Outbound & Inbound Calls
Configure Outbound Calls
To place outbound calls you need to configure Outbound Routes. Follow these steps to configure your outbound routes:

- Navigate to the Outbound Route option under Call Control in the left-hand menu, then click the Add button.
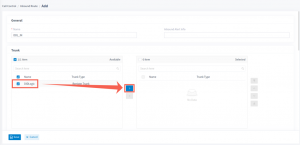
- Provide a name for your Outbound Route.
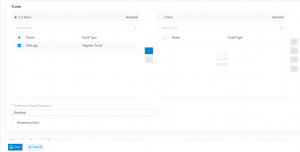
- In the Trunk section, choose the newly created SIP trunk and use the right arrow button to move it into the Selected section.
- Under Extension/Extension Group, select the extensions or extension groups that will use this outbound rule, and again, click the right arrow button.
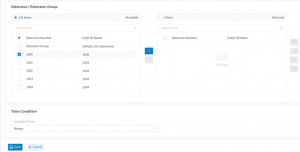
- Save your changes by clicking Save.
Configure Inbound Calls
To enable incoming calls on your Yeastar PBX, follow these steps:
- Access Inbound Route Settings: From the left-hand menu, navigate to Call Control > Inbound Route.
- Create a New Inbound Route: Click the Add button to create a new route.
- Enter a name for your Inbound Route.
- In the Trunk section, choose the newly created SIP trunk and use the right arrow button to move it to the Selected section.
- Under Default Destination, select the preferred destination.
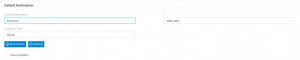
- Click Save to confirm and apply your changes.
Configure an Inbound Route in DID Logic
- Log in to your DID Logic account and navigate to the PURCHASED tab in the top menu.
- Click Edit under the Destination section.
- Select the SIP device and the destination SIP account.
- Click Add to set the destination for the DID.

Set up inbound calls using a SIP URI
[NOTE]
SIP trunks with IP authentication enabled cannot be used for inbound call routing, as they do not maintain registration with DID Logic regional gateways. To set up inbound routing for your numbers, you must use a valid SIP URI address instead.
Configure Inbound Call Routing to a Valid SIP URI
Follow these steps to set up the routing:
- Log in to your DID Logic account and navigate to the PURCHASED tab in the top menu
- Click Edit under the Destination section
- Select the SIP URI and enter a valid SIP URI in the following format:
+[did]@FQDN:port;transport=connection
- FQDN is the fully qualified domain name or IP address of your Yeastar PBX.
- Port is the SIP port used by the PBX.
- A connection can be
udp,tcp, ortls, withudpas the default transport.
For example, if your Yeastar PBX domain is sip.yourpbx.com, the PBX’s static IP is 18.193.195.38, and the PBX uses port 5060 over UDP for communication with the DID Logic trunk, the SIP URI can be formatted as follows:
[email protected]:5060;transport=udp
[email protected]:5060;transport=udp
Click Add to set the destination for the DID.
Troubleshooting
If an outbound call fails, check the following:
- Ensure you have completed all the steps outlined in this guide.
- Confirm that the phone number you are dialing is in the international E.164 format.
- Check that the maximum call rate limit on your SIP account or user account is sufficient for calling the desired destination. You can find your effective rates in the page https://didlogic.com/sipaccounts
Free trial is available for IT infrastructure managers and developers.