


Vital PBX Setup Guide for DIDlogic
Introduction
VitalPBX is a unified communications PBX system based on Asterisk and Linux (Debian 11). VitalPBX provides a robust and scalable platform, which will allow the customer to manage their PBX easily and intuitively.
Purchase a DID number on the DIDlogic platform
Before placing or receiving a call, you need to have an active DID on your DIDlogic account. If you already have an active number on your DIDlogic account, the below steps are optional.
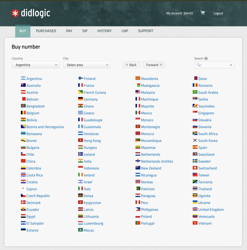
To purchase a DID on your DIDlogic account:
- Log in to your account
- Click on Buy in the top menu
- Select a country and region you wish to purchase a DID in
- Choose a specific number or numbers and click the Add to Cart button
- You will be redirected to the Cart where you can confirm your choice and check out the DID(s).
Once you have purchased the DID, it will be reflected in the PURCHASED tab.
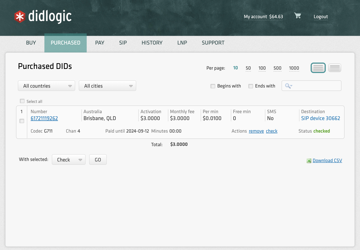
NOTE
Some DIDs may require proof of local address and other documents before they can be activated. To enable these DIDs to receive inbound calls, upload the documents required, and wait until they are approved by the DIDlogic Number Provisioning team.
Create a SIP Account on the DIDlogic platform
To create a new SIP account on the DIDlogic platform
- Select SIP in the top menu
- Click the Create SIP Account button
- Specify the SIP account name, set the SIP account password, and select one of the DIDs on your account as Caller ID
- Optionally you can set max outbound call duration, max number of simultaneous calls via the SIP account, and max call cost. If these parameters are not set, global account limits apply.
- Click Create
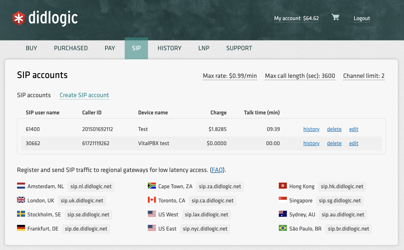
NOTE:
Please be advised that your 5-digit SIP account username is generated automatically and displayed in the SIP account ID column.
Setting up VitalPBX
After concluding the portal configurations, proceed with the Trunk creation on VitalPBX.
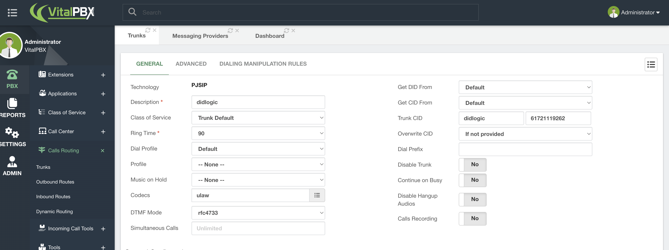
To start with our trunk setup, define the fields below in the top section.
- Description: It can be any alphanumeric string for identifying the trunk.
- Profile: It can be any UDP PJSIP Profile (usually the “Default PJSIP Profile”).
- Codecs: select “ulaw”, “alaw”, or “g729”.
- Trunk CID: for the name field, you can use any alphanumeric string, but for the number, you must provide the DID purchased in the initial steps using the +E.164 format (e.g., +1652221111).
- Overwrite CID: we will select the value “If not provided” to use the value of the field “Trunk CID” as the fallback value in case the extensions don’t have an External CID defined.
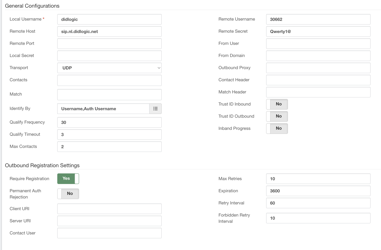
Next, in the sections “General Configurations and Outbound Registration Settings,” define the fields below.
- Local Username: it can be any alphanumeric string without spaces.
- Remote Host: regional SIP gateway “sip.***.didlogic.net .”
sip.***.didlogic.net – instead of *** please select one of DIDLogic’s regional SIP gateways. The full list located at the bottom of the “SIP” tab when you log in to http://didlogic.com.
For example, if your environment is located in the USA, you should select the SIP proxy closest to your location, such as sip.nyc.didlogic.net for New York or sip.lax.didlogic.net for Los Angeles.
- Identify By: select the “Username” and “Auth Username” options.
- Remote Username: use the “SIP account ID” (30662 in this case) value from the SIP accounts list.
- Remote Secret: enter the password defined during the SIP account creation.
- Require Registration: set the value of this field to “Yes.”
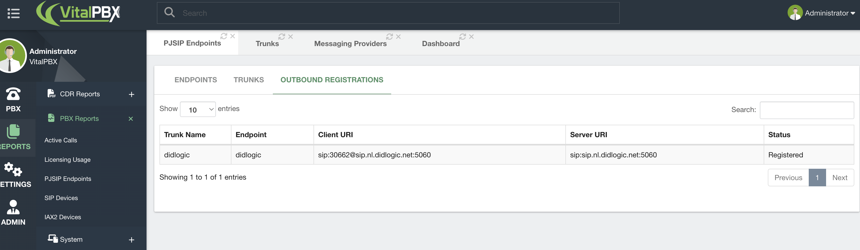
After saving the trunk and applying changes, you can monitor the trunk status by navigating to “Reports / PBX Reports / PJSIP Endpoints.” Once there, you must select the “Trunks” tab.

Additionally, you can check the trunk registration status by selecting the “Outbound Registrations” tab in the “PJSIP Endpoints” module.
Activate IP authentication
The DIDlogic platform supports IP authentication for dedicated IP addresses. To activate IP authentication for your SIP device you need to enable this feature in your VitalPBX and on the DIDlogic side.
Complete the below steps in your VitalPBX:
- Open your VitalPBX SIP Trunk settings -> “General Configurations and Outbound Registration Settings”
- Set the Identify By to the IP
- Set the Require Registration to “No”
- Click Save to apply changes
To activate the IP authentication on the DIDlogic platform:
- Submit a request to the DIDlogic Support Team via the DIDlogic Portal by clicking on the Support button, or via Email to [email protected] with a request “Please enable IP authentication on IP XXX.XXX.XXX.XXX”
IMPORTANT
After submitting the IP authentication request, you’ll not be able to update your IP address or change the authentication method.
Once your request is approved by the DIDlogic ops team, IP authentication will be activated on your DIDlogic SIP account.
IMPORTANT
By default, an IP address can only be mapped to a single SIP account. If you need to have several DIDlogic SIP accounts sharing the same IP address, please contact [email protected]
Configure outbound route
After the verification that the trunk is up and running, create the outbound route to place calls using our PJSIP trunk.
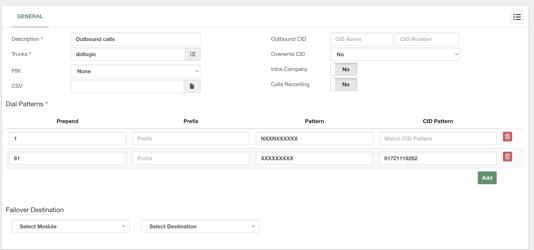
The following options are available:
- X: Represents a single digit from 0 to 9.
- Z: Represents any digit from 1 to 9.
- N: Represents a single digit from 2 to 9.
- .: Wildcard, matches one or more characters.
- !: Wildcard, matches zero or more characters immediately.
- [1237-9]: Matches any digit or letter in the brackets (in this example, 1,2,3,7,8,9)
- [a-z]: Matches any lower-case letter
- [A-Z]: Matches any Upper-case letter
All destination phone numbers must be in the E.164 international format. E.164 numbers can have up to fifteen digits and are usually formatted as follows:[+][country code][subscriber number including area code]. An example of a US number in E.164 format is +16561223344. The DIDlogic platform rejects calls to numbers without country codes or carrying national access codes.
Below are typical examples of incorrectly formatted phone numbers

Configure inbound calls

To receive inbound calls you need to configure Inbound Routes.
To route calls to your VitalPBX instance, log in to your DIDlogic account, select PURCHASED in the top menu, and click on the DID’s Destination link.
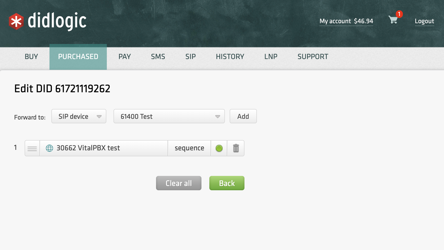
- Select the destination SIP account in the Forward To section
- Click Add to add the destination for the DID
- Click Save to save the settings
Configure inbound call routing for SIP Accounts with IP authentication
NOTE
Skip this section if your trunks are configured to use account-based authentication.
When an inbound call reaches the DIDlogic, it can be routed to your SIP account, SIP URI, or PSTN number.
IMPORTANT
SIP accounts with IP authentication enabled cannot be used for inbound call routing as they do not maintain registration with DIDlogic proxies. In order to configure inbound routing for your numbers you must specify a valid SIP URI address instead.
To configure inbound call routing to a valid SIP URI:
- Log in to your DIDlogic account
- Select Purchased
- Click on the Destination link of the DID
- Select SIP URI in the Forward To drop-down menu
- Enter a valid SIP URI using the following format: +[did]@FQDN:port;transport=connection, where:
a. FQDN is the fully qualified domain name or IP address of your VitalPBX instance
b. The port is the SIP port used by the PBX
c. The connection could be either UDP, TCP, or TLS. The default transport is UDP
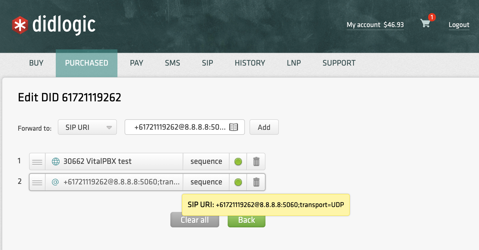
- Click Add to add the destination for the DID
- Click Save to apply settings
Remember that the [did] parameter will be automatically updated with the actual dialed phone number when routing the call.
For testing outbound calls, you can place a test call to a phone number outside of your network; it can be your mobile number, for instance.
You can call from your mobile to any of your DIDs to test inbound calls.
If the outbound call fails check the following:
- You’ve completed all the steps in this guide
- You’re dialing the phone number in the international E.164 format
- The max call rate limit set on your SIP Account or account is enough to call the desired destination.
Free trial is available for IT infrastructure managers and developers.