


Avaya IP Office - DIDlogic SIP Trunk Setup Guide
Introduction
This guide assumes that you have already purchased or ported in a number and have some familiarity with the user portal.
For the full guide to using the DIDlogic Portal, please click on the following link: https://didlogic.com/setup/provisioning-help/portal-tour/
Components used
- Avaya IP Office PBX R9.1
- Avaya IP Office Manager R11.0
DIDlogic regional gateways:
| Regional gateway | FQDN | IP Address |
|---|---|---|
| Primary regional gateway | sip.se.didlogic.net | 5.150.254.205 |
| Secondary regional gateway | sip.nl.didlogic.net | 185.118.63.77 |
Note: Carefully select the primary gateway with minimal ping and a failover option.
Configuring SIP Trunk on the DIDlogic portal
Creating SIP Account
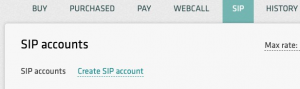
On the “SIP” tab click “Create SIP account”, then:
- Configure the Device Name (optional). Device names are especially useful when you manage multiple SIP accounts.
- Set password. Remember that strong passwords are a critical element of account security.
- Repeat password
- Set a Caller ID associated with the SIP account. Only DIDs purchased through DIDlogic will be available on the dropdown list.
- ‘Send inbound didinfo’ option should be enabled when registering a PBX or an SBC. This feature will instruct the DIDlogic gateways to replace the SIP Account number in the SIP URI and ‘To:” headers with the originally dialed number (DID). This option should be disabled only if you are registering SIP Phones directly with DIDlogic.
Tip. If you prefer to manage Caller IDs locally on Avaya IP Office, please be sure to either inform your account manager or email [email protected] to have this feature enabled on your account (see Configuring Caller ID passthroughsection for more details).
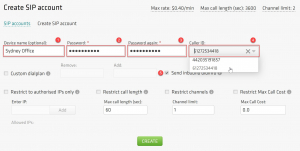
Click Create button to complete the configuration.
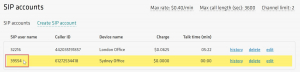
Once SIP Account is created you will see the 5-digit number that you should use as the Username to authenticate your SIP Line with DIDlogic.
Setting up inbound routing
There are 3 options for the inbound call routing:
- SIP device: incoming calls will be to the respective SIP account, if there is an active registration on any of the DIDlogic gateways
- SIP URI (user_part@domain_part): incoming calls will be routed to the specified SIP URI address
- Phone: incoming calls will be forwarded to a PSTN number
Note:
- Multiple destinations can be configured for a single DID to ensure failover or provide call coverage options
- You can choose the preferred call distribution algorithms: ‘sequential’ or ‘ring all’
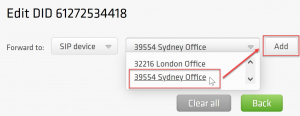
Go to the Purchased tab and click Edit on the number you want to be routed to a SIP Account.
Select destination SIP Account and click Add:
Now that your SIP account has been created and the inbound routing set up, you can start configuring your Avaya IP Office PBX.
Configuring SIP Trunk on Avaya IP Office PBX
Configure SIP Line
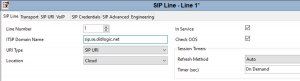
Open Avaya Office Manager and connect to your Avaya PBX. Right-click on the Line, New, SIP Line from the main menu:
- On the SIP Line Tab put the ITSP domain name: sip.se.didlogic.net
- Keep the default values for the remaining fields
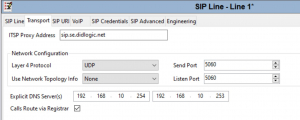
On the Transport Tab configure:
- ITSP Proxy Address: sip.se.didlogic.net
- Add your preferred DNS servers
- Keep the default values for the remaining fields
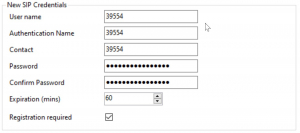
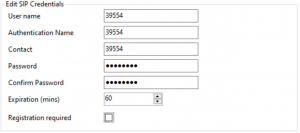
On the SIP Credentials Tab add SIP Trunk authentication details:
- Username: put SIP user name of your DIDlogic SIP Account
- Repeat the same for Authentication name and Contact
- Put the Password you set for the SIP Account on the DIDlogic portal
- Registration required should be checked
- Click OK to add the credentials
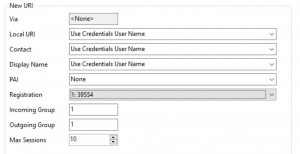
On the SIP URI Tab, click Add and set the following:
- Registration: choose the SIP credentials you configured in the previous step
- Local URI, Contact, Display Name: choose Use Credentials User Name
- Incoming Group, Outgoing Group: set to SIP Line number (1 in this example)
- Max Sessions: set the number of concurrent calls according to your SIP Trunk limits
- Click OK to save SIP URI settings
Click OK to save the SIP Line configuration.
Configure Outbound Calls
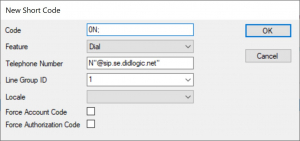
From the main navigation pane go to ARS, Main, and click Add to create a new ARS entry:
- Code: 0N; assuming you have prefix 0 to call via this SIP Trunk
- Telephone Number: N”@sip.se.didlogic.net”
- Line Group ID: SIP Line ID (1 in this example)
- Use defaults for other fields
- Click OK to add a new ARS Entry
Outbound calls should work now.
Configure Outbound Calls with Caller ID Passthrough
When configuring SIP Account settings on the DIDlogic portal, you normally assign one of the purchased DID numbers as Caller ID.
If you want to use your own A-numbers and send them directly from Avaya IP Office, first contact your account manager or send an email to [email protected] and request Caller ID passthrough to be activated. Note that this feature may be unavailable depending on individual eligibility.
Once your request is approved and the feature is enabled, you will need to remove Caller ID assigned to your SIP Account to allow Custom Caller ID passthrough.
Updating SIP Account settings
Log in to the DIDlogic Portal, go to the SIP section, and click Edit on the SIP Account. Remove the Caller ID and click Update:
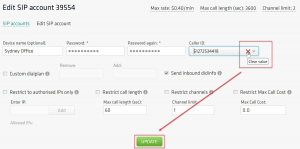
You should see your SIP Account updated:

Tip. If there is no Caller ID associated with the SIP Account while the Caller ID passthrough is disabled, your outbound calls will be passed over the public network with an Anonymous Caller ID. Anonymous calls tend to be routinely deprioritized and may even be barred by carriers.
Configuring Custom Caller ID on Avaya IP Office
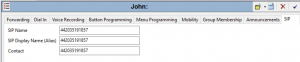
From the main navigation pane click on User and select the User you want to dial from a specific Caller ID, go to the SIP Tab, and set:
- SIP Name, Sip Display Name (alias), Contact: Caller ID you own
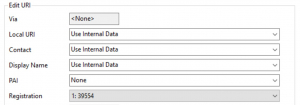
Go to SIP Line configuration, open the SIP URI Tab, click Edit, and set:
- Local URI, Contact, Display Name: Use Internal Data
- Click OK to save changes
Configure Inbound Calls
From the main navigation pane right-click on Incoming Call Route and click New.
On the Standard Tab:
- Choose Line Group ID: 1 (in this example)
- Incoming Number: put the DID number routed by DIDlogic to your PBX in E.164 form
- Use defaults for other parameters

On the Destinations Tab set the desired Destination and Fallback Extension

Click OK to save the configuration.
Authenticate your Avaya IP Office PBX
By default, DIDlogic responds with 407 Proxy Authentication Required to every SIP INVITE. In the previous steps, we’ve configured SIP Credentials on the SIP Line to use this authentication method.
Alternatively, you can enable IP Authentication for your SIP Account. In this case DIDlogicgateway will accept all outbound calls from the IP address you specify without further authentication. To setup IP Authentication please contact support at [email protected] and provide the public IP Address you will be sending outbound calls from.
Note:
- SIP Accounts with IP Authentication enabled cannot be used as the destination assigned to DIDs on the portal. SIP URI routing must be used instead.
Configure Avaya IP Office PBX for IP Authentication
Go to SPI Line and uncheck Calls Route via Registrar on the Transport Tab
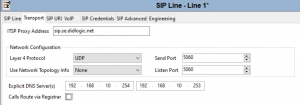
On the SIP Credentials Tab click Edit and uncheck Registration required
Save SIP Credentials and SIP Line configuration. Your PBX is configured for IP Authentication on the SIP Line.
Setting up failover routing
To ensure continuity of business operations and protect from potential service interruption, SIP Trunk failover scenarios should be considered.
In this guide, we provide configuration options for failover of both incoming and outgoing calls.
Inbound calls failover
To protect against inbound call disruptions, we’ll use dual SIP Line registrations.
From the main navigation pane right-click on the Line, New, SIP Line.
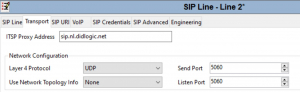
On the SIP Tab configure ITSP Domain Name set as sip.nl.didlogic.net (Secondary Regional SIP Gateway)
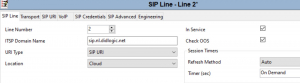
On the Transport Tab configure ITSP Proxy Address: sip.nl.didlogic.net (Secondary Regional SIP Gateway)
Configure SIP Credentials and SIP URI the same as for the Primary SIP Line and save configuration.
From the main navigation pane right-click on the Incoming Call Route, and click New.
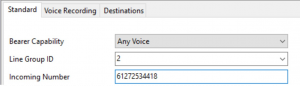
On the Standard Tab configure:
- Incoming Number: same as for the Primary SIP Line
- Line Group ID: ID of the secondary SIP Line (2 in this example)
On the Destinations Tab set Destination and Fallback Extension to the same values as for the incoming calls routing over the Primary SIP Line.

Configuration for the Inbound Calls failover is completed.
Outbound calls failover
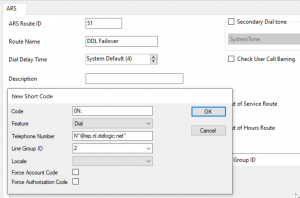
From the main navigation pane, go to ARS and configure the new ARS route:
- Route Name: DDL Failover
- Click Add to configure New Short Code:
- Code: 0N;
- Telephone Number: N”@sip.nl.didlogic.net”
- Line Group ID: 2 (Secondary SIP Line ID)
- Use defaults for other parameters
- Click OK to save Short Code
- Click OK to Save the new ARS route
Edit Main ARS route and configure failover options:
- Out of Service Route: DDL Failover
- Alternate Route: DDL Failover
- Click OK to save changes
Configuration for the Outbound Calls failover is completed.
Common issues
Common issues with outbound calls
- 603 Declined response might be caused by the lack of active registration. Review SIP Line settings:
- Ensure the Registration Required option is enabled under SIP Line > SIP URI
- Verify that the User Name, Authentication Name, and Password match the details configured on the DIDlogic portal.
- another typical reason for the 603 Declined is a call to the destination with the per minute rate higher than the Max rate set for your account. You can find your effective Max rate on the SIP tab. If you would like to have it changed, please contact [email protected]
- incorrect destination number format. For example, dial the full international number (E.164): 12125551212 (US), 442085000000 (UK). Dialing 2125551212 won’t work. Do not dial with 0, 00 or 011 in front. This guide explains how you can strip the leading digits before the call is routed to DIDlogic.
Common issues with inbound calls
- make sure IP addresses of DIDlogic regional gateways are allowed on the firewall
- verify Line Group ID: Ensure the correct Line Group ID is assigned to both the trunk and the route
- use System Monitor in IP Office to see how the call is being presented. This can help you verify the format of the incoming DID and troubleshoot mismatches
Free trial is available for IT infrastructure managers and developers.